You know, I remember the first time I tried to download a ridiculously large file on a sketchy public Wi-Fi network. It was one of those moments where you’re hovering over the download button, your brain screaming “DO IT!” while a tiny, sensible voice in the back whispers, “Are you sure about this, pal?” And then, like a guardian angel in digital form, something pops up on my iPhone, nudging me towards a more… let's call it secure path. It turns out, that nudge was iCloud Private Relay, and while it’s a fantastic tool for privacy (more on that later!), it can also be a bit of a speed bump when you just want to get your massive file downloaded now.
For ages, I just accepted it. “Oh, this is just how it works now,” I’d mutter to myself, as my download speeds plummeted faster than a dropped smartphone. But then, a friend of mine, who’s much more tech-savvy than I am (bless their patient heart), pointed out that I could actually turn it off if I needed to. The revelation was like discovering a hidden shortcut in a video game I’d been playing on hard mode for years. So, if you’ve ever felt that same frustration, that same slow-motion internet experience, and wondered, “Can’t I just… you know… turn this thing off?” then my friend, you’ve come to the right place. This is your guide to tackling Private Relay.
So, What Exactly Is This Private Relay Thing Anyway?
Before we dive into the glorious act of disabling it, let’s quickly chat about what iCloud Private Relay actually does. Think of it as a super-secret tunnel for your internet traffic. When you’re browsing the web on your iPhone, iPad, or Mac with Private Relay enabled, your requests don’t go straight from your device to the website. Instead, they’re routed through two separate relays operated by Apple and a third-party partner.
This means two things: first, your IP address is masked. Websites can’t see your actual location, just the general area of the relay server. Second, your browsing activity is encrypted from your internet provider. So, even your ISP can’t see which specific websites you're visiting. Pretty nifty, right? It’s all about beefing up your online privacy, which, let’s be honest, is becoming more important than finding a decent parking spot these days.
It's essentially Apple's answer to helping you browse the web with a bit more anonymity, keeping those prying eyes (whether they're advertisers, websites, or even your internet provider) from getting a clear picture of your online comings and goings. Apple is all about keeping your data your data, and Private Relay is a big part of that philosophy.
Why Would I Even Want To Turn It Off?
Now, I know what you're thinking: "If it's so great, why would anyone want to disable it?" Good question! And there are a few perfectly valid reasons:
1. The Speed Demon in You Needs a Fix
This is the big one, and it’s likely why you’re here. Because Private Relay adds an extra hop for your internet traffic, it can sometimes slow down your connection. This is especially noticeable when you’re doing bandwidth-heavy activities like downloading large files, streaming high-resolution video, or playing online games that require a super-snappy connection. If you’re experiencing buffering that makes a sloth look like Usain Bolt, or downloads that take an eternity, disabling Private Relay might be your ticket to faster speeds. You know, when you just need that file yesterday.
2. Some Websites Just Don't Play Nice
Here’s where things get a little ironic. While Private Relay is designed to improve your online experience by enhancing privacy, some websites and services have gotten a bit… grumpy about it. Because your IP address is masked, some services might flag it as suspicious or even block access entirely. This can happen with local services that rely on your IP address for geographic verification, or certain banking applications that want to be extra sure it’s really you logging in. It’s like trying to enter a club that has a strict “know your face” policy, and you’re showing up with a cool, anonymous mask on.
3. You're Already Protected (or Don't Need the Extra Layer)
Maybe you’re already using a Virtual Private Network (VPN) for your online security and privacy needs. In that case, having Private Relay on in addition to your VPN might be overkill and could potentially lead to even slower speeds. Or, perhaps you’re on your trusted home Wi-Fi, and you’re not particularly concerned about your ISP seeing your browsing habits. In these scenarios, the benefits of Private Relay might not outweigh the potential drawbacks for your specific situation.
4. Troubleshooting Woes
Sometimes, you might encounter weird internet issues. Websites not loading correctly, specific apps acting up, or general connectivity problems. If you’ve tried all the usual IT department-approved steps (turning it off and on again, clearing cache, etc.) and nothing works, disabling Private Relay is a good troubleshooting step. If disabling it magically fixes your problem, you’ve likely found your culprit. It's like playing detective with your internet connection!
The Moment of Truth: How to Disable iCloud Private Relay (Step-by-Step!)
Alright, enough preamble! You’ve decided you want to take back control of your internet speed or bypass those pesky website restrictions. Here’s how you do it. It's actually surprisingly straightforward, and you don't need a degree in computer science. I promise!
On Your iPhone or iPad (The Most Common Scenario)
This is where most of us will be interacting with Private Relay. So, let's get our devices out and follow along. It's a few taps, and you'll be on your way. Think of it as a quick pit stop for your internet connection.
-
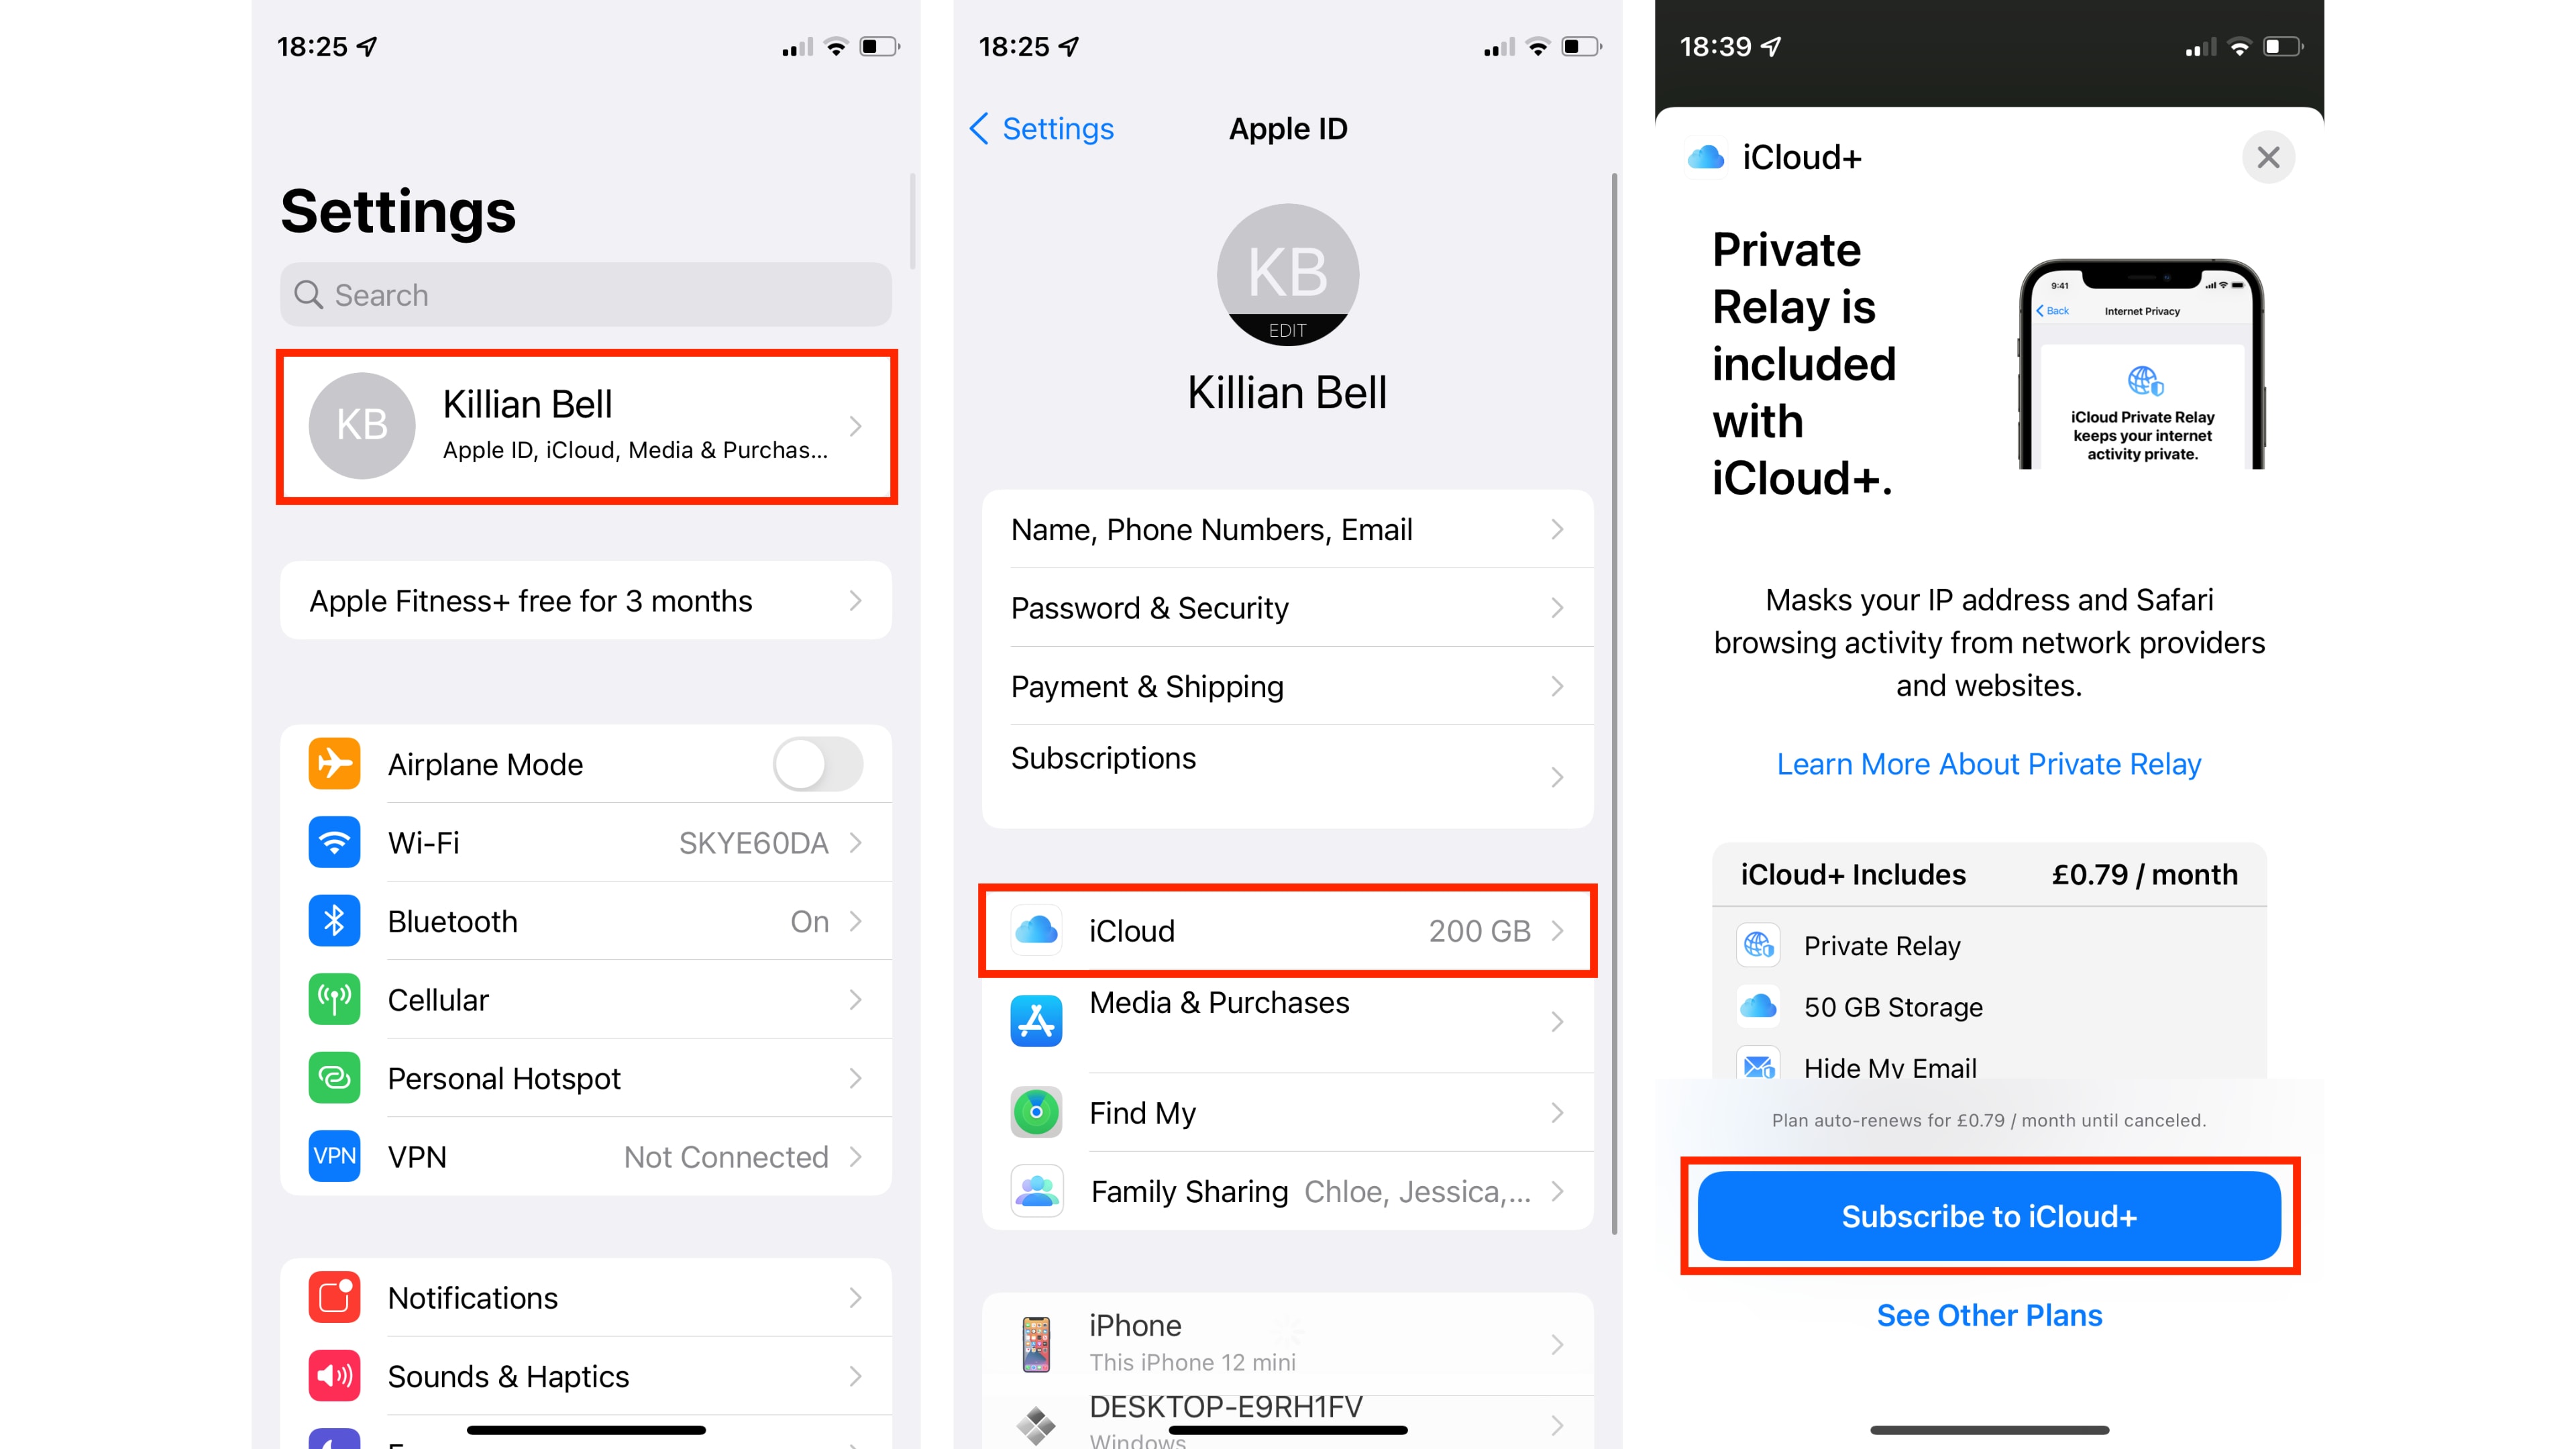
Open the Settings App: Find that familiar gray gear icon on your Home Screen and tap it. You know the one, it's like the digital Swiss Army knife of your phone.
-
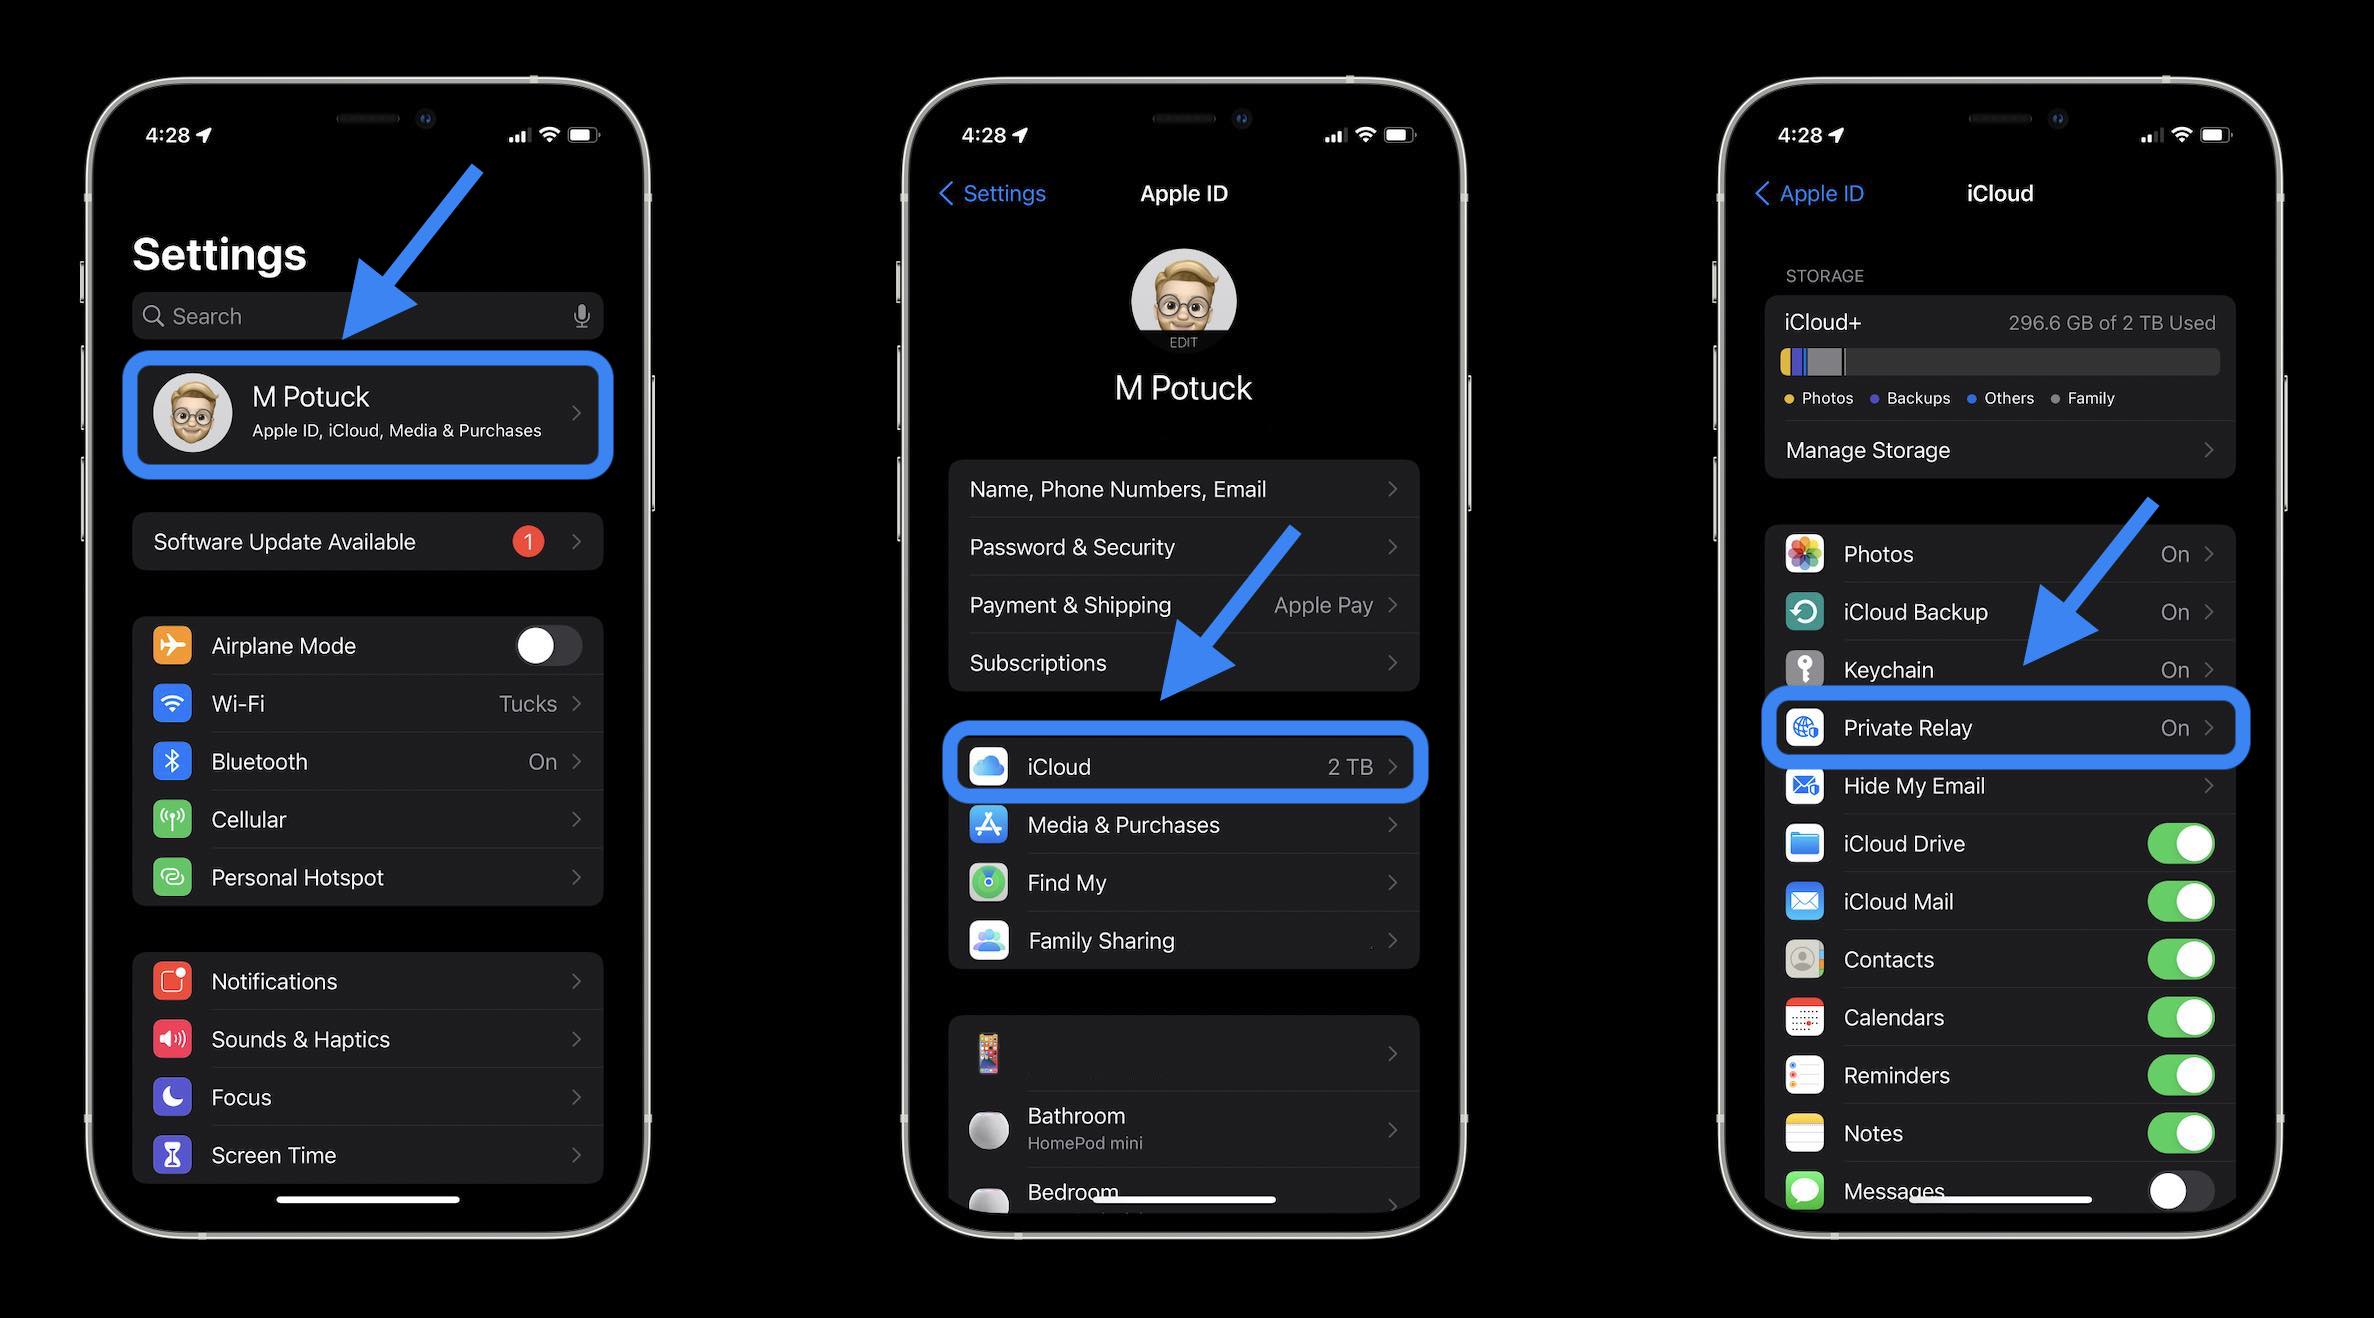
Tap Your Name/Apple ID: At the very top of the Settings screen, you’ll see your name and profile picture. Give that a good tap. This is where all your iCloud goodies are managed. Pretty central, right?

Disable Private Relay Monterey at Ernest Barber blog -
Tap iCloud: Now, look for the “iCloud” option. It might be grouped with other Apple services. Tap on it. This is the gateway to all things iCloud, including our elusive Private Relay.
-
Tap Private Relay: You should see “Private Relay” listed here. It might have a little toggle switch next to it. This is the main event, folks! Tap on “Private Relay.”
-
Toggle Off Private Relay: You’ll now see an option that says “Turn Off Private Relay.” You’ll get a little pop-up asking you to confirm. It might also give you a friendly reminder about what you’re disabling. Go ahead and tap “Turn Off Private Relay” again to confirm. And voilà! You’ve done it.
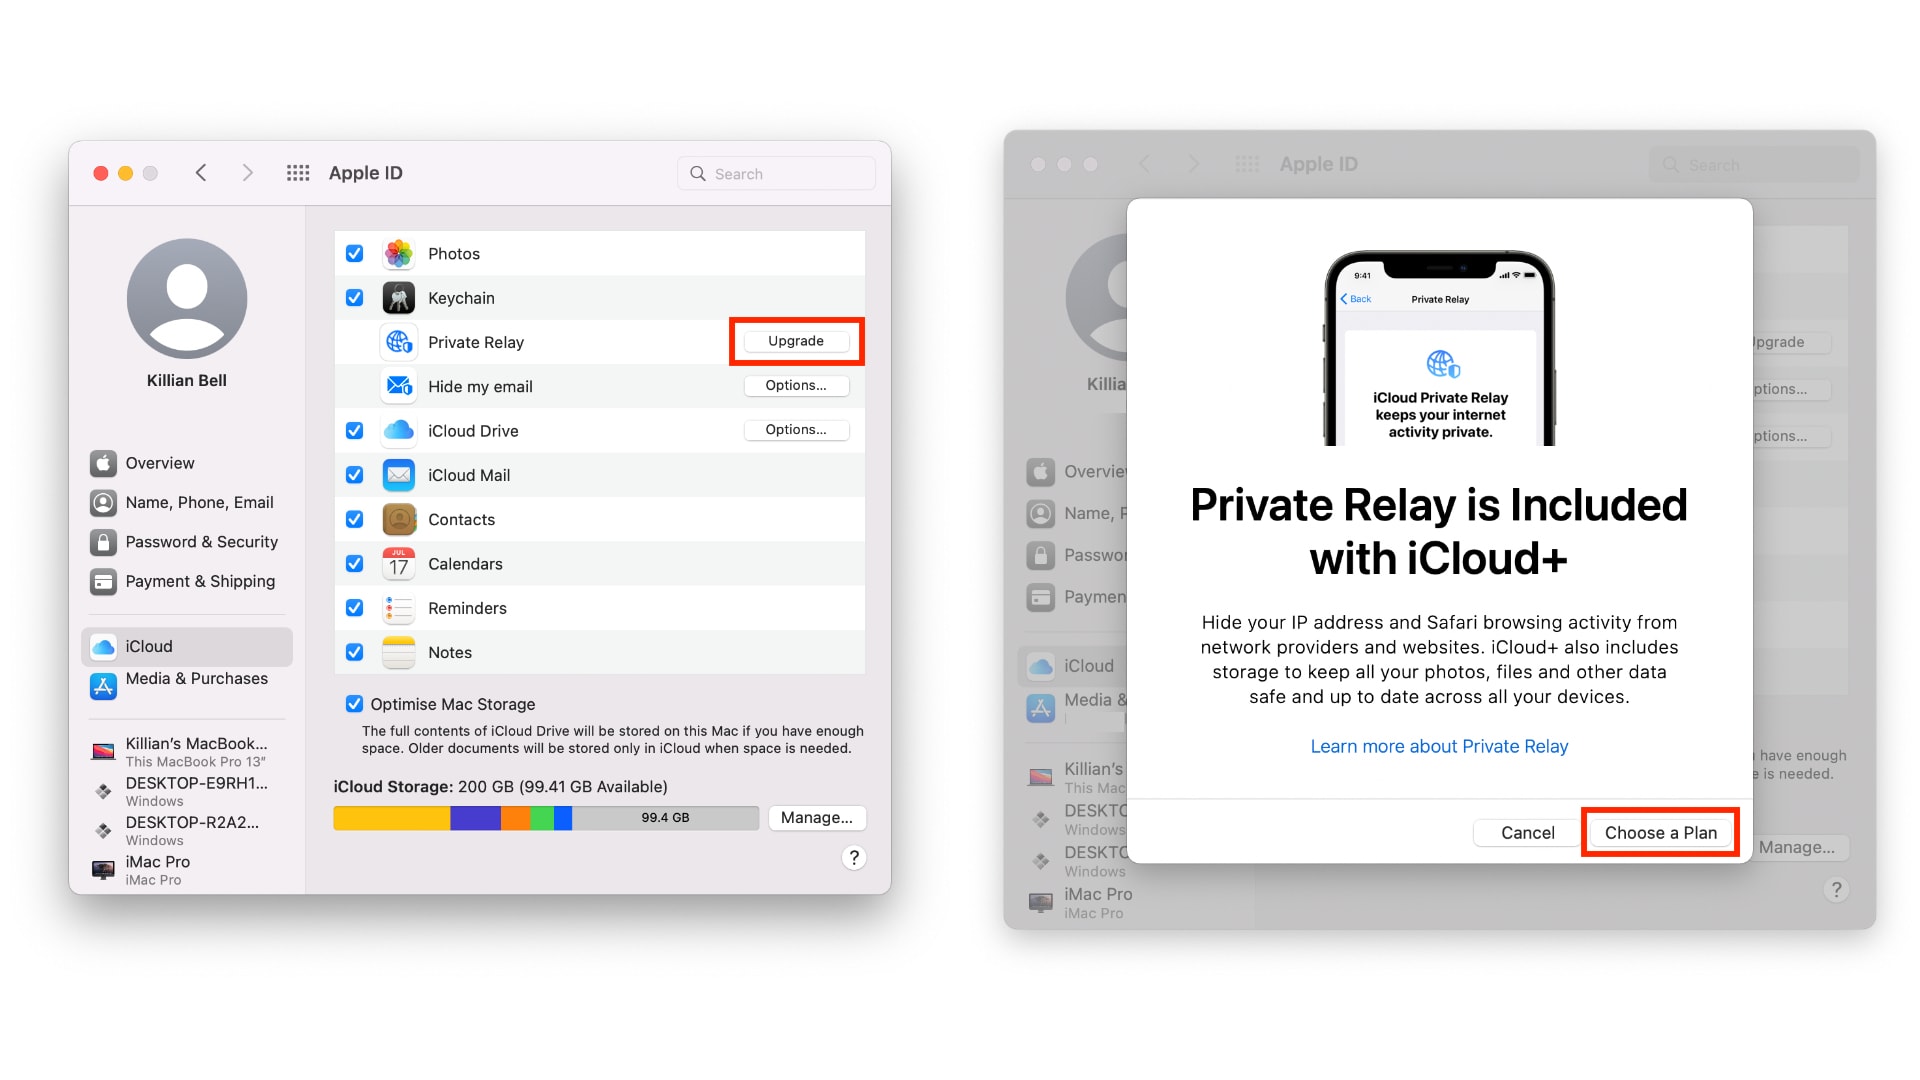
Important Note: You’ll notice that this option is only available if you have an iCloud+ subscription. If you don't have iCloud+, you won't see Private Relay as an option to disable because it’s a feature tied to that paid service. So, if you’re on the free tier, this whole guide might not even apply to you!
On Your Mac (For the Desktop Warriors)
If you're more of a Mac person, or you're doing your browsing on a laptop, the process is pretty similar. Just follow these steps:
-
Open System Settings (or System Preferences): On macOS Ventura or later, it’s “System Settings.” On older versions, it’s “System Preferences.” Find it in your Applications folder or click the Apple menu in the top-left corner.
Disable Private Relay Monterey at Ernest Barber blog -
Click Your Apple ID: Just like on your iPhone, click on your name and Apple ID at the top of the System Settings sidebar.
-
Click iCloud: In the main window, find and click on “iCloud.”
-
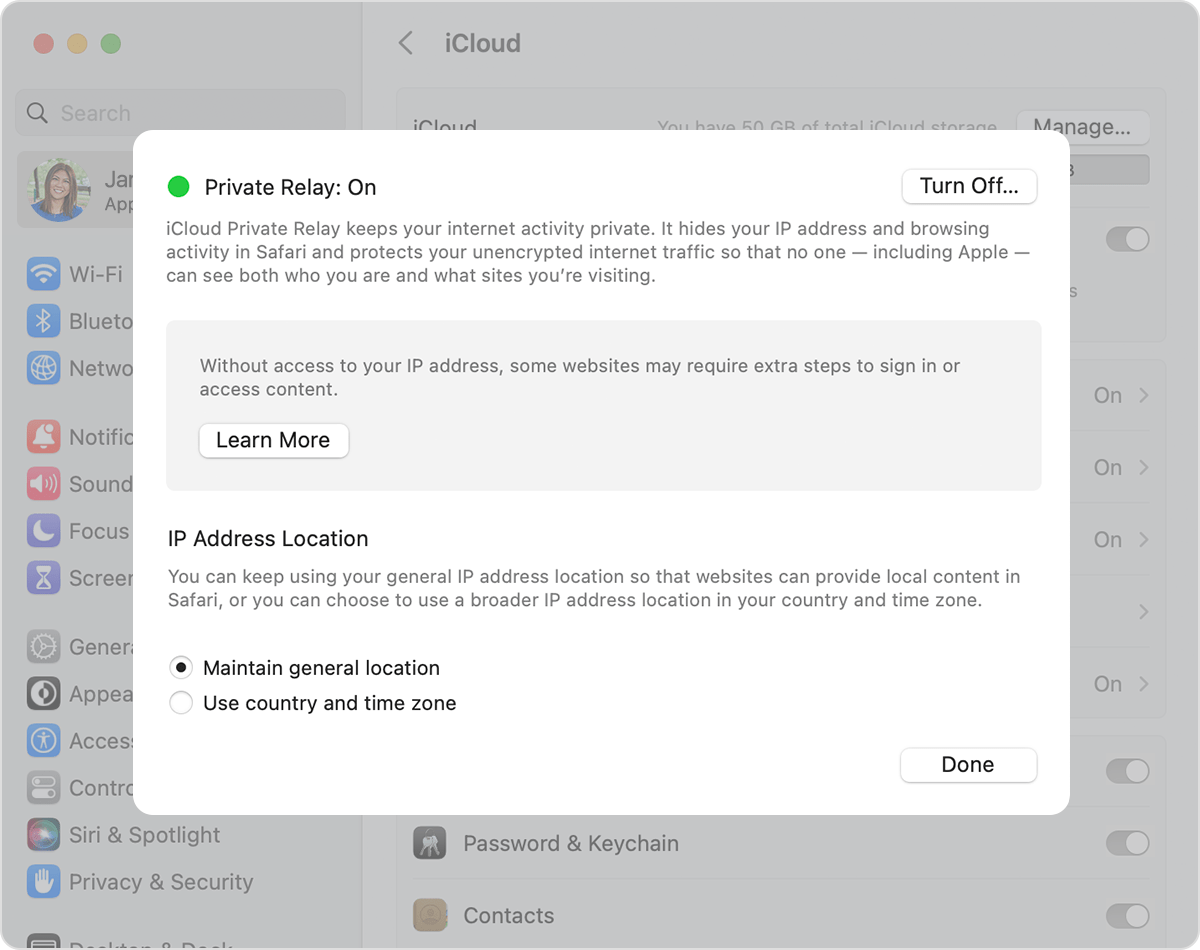
Click Private Relay: You should see “Private Relay” listed under your iCloud features. Click on it.
-
Turn Off Private Relay: Similar to the iPhone, you’ll see an option to “Turn Off Private Relay.” Click it and confirm the action when prompted. Easy peasy!
Again, remember this is an iCloud+ feature. If you’re not subscribed, you won’t see this option. Apple likes to keep its premium features… well, premium!
What Happens After You Disable It? (And What to Look Out For)
So, you’ve successfully disabled Private Relay. What now? Well, for most people, the immediate effect will be a noticeable boost in internet speed. Those downloads that were crawling will hopefully pick up the pace, and your streaming should be a lot smoother. You might also find that websites that were previously giving you trouble now load perfectly fine. It’s like giving your internet connection a breath of fresh air.
However, it's also worth remembering that you're now browsing the web without that extra layer of IP masking and encryption from your ISP. This means your IP address is visible again to websites, and your ISP can see the specific sites you visit. If you're sensitive about this, you might want to consider other privacy solutions.
If, for some reason, disabling Private Relay doesn’t fix the issue you were experiencing, then the problem likely lies elsewhere. This is when you might need to dig a bit deeper into your network settings, your router, or even contact your internet service provider. But hey, at least you’ve ruled out one common culprit!
When Should You Consider Turning It Back On?
Disabling Private Relay isn’t necessarily a permanent decision. There might be times when you want to re-enable it. For instance, if you’re traveling and connecting to public Wi-Fi networks, or if you’re browsing sensitive topics and want that extra layer of privacy, turning Private Relay back on can offer peace of mind.
To turn it back on, simply follow the exact same steps as disabling it, but this time, you'll be looking for the option to "Turn On Private Relay" or simply toggling the switch to the 'on' position. It’s like flipping a switch, ready to protect you again when you need it most. Remember, the beauty of these features is that you can toggle them on and off as your needs change. Flexibility is key!
The Takeaway: Power is in Your Hands (and Settings)
So there you have it! Your comprehensive, no-nonsense guide to disabling iCloud Private Relay. It’s a powerful tool for privacy, but sometimes, you just need to let your internet connection run free and fast. By following these simple steps, you can easily toggle Private Relay on or off, giving you more control over your online experience.
Whether you’re a speed demon who needs faster downloads or someone who’s encountered a pesky website restriction, you now have the knowledge to make the change. Don't be afraid to experiment and find what works best for your internet needs. After all, isn't that what technology is all about? Making our lives a little bit easier, and giving us the power to choose how we interact with the digital world.
:max_bytes(150000):strip_icc()/002_turn-off-icloud-private-relay-5200342-c151ee4fa2ad4911a3eb6ea1ef5305e9.jpg)
