Alright, gather ‘round, folks, and let me tell you a tale. A tale of wood, of angles, and of a ceiling that, dare I say, decided to reach for the heavens. We’re talking about the majestic cathedral ceiling, that architectural marvel that makes your humble abode feel like a… well, like a cathedral! And for those of you brave enough to embark on this DIY adventure, or maybe just curious about what’s holding up all that glorious height, we’re diving headfirst into the not-so-terrifying world of installing a cathedral ceiling support box. Don’t worry, it sounds way scarier than it is. It’s less "Indiana Jones and the Temple of Doom" and more "Paddington Bear and the Mildly Confusing Piece of Lumber."
So, what exactly is this mystical "support box"? Think of it as the unsung hero, the superhero’s secret lair, the quiet guardian of your soaring ceiling. Without it, your beautiful, lofty ceiling might just decide to have a little existential crisis and, you know, sag like a deflated souffle. And nobody wants a saggy ceiling. It’s like a bad haircut for your house.
The Grand Plan: Why Bother with a Box?
Let’s get down to brass tacks, or in our case, wood tacks. A cathedral ceiling isn't just a regular, flat ceiling chilling at a cozy 8 feet. Oh no. It’s a ceiling that decided to go on a diet and get tall. This means the roof rafters are angled, creating that lovely, airy space. But here’s the kicker: those angled rafters need some serious structural love to keep them where they’re supposed to be. Enter our star player: the cathedral ceiling support box.
This contraption, often a sturdy wooden framework, is designed to distribute the weight of your roof and ceiling evenly. It’s like a perfectly choreographed dance of joists and beams, all working in harmony to prevent any… gravity-related incidents. Plus, it’s where your electrician will eventually get to play with their sparkly wires and make your fancy pendant lights shine. So, it's not just about structural integrity; it's about future chandelier glory!
Gathering Your Tools: The Arsenal of Awesome
Before we start building, let’s make sure you’re equipped. You wouldn’t go into battle without your trusty shield, right? Well, you shouldn’t try to build a support box without these bad boys:
- Measuring Tape: The undisputed champion. Measure twice, cut once. And then measure again, just to be sure. We’re aiming for precision, not abstract art.
- Pencil: For marking your cuts and perhaps doodling motivational stick figures on your lumber.
- Saw: Circular saw, miter saw, even a really enthusiastic handsaw if you're feeling retro. Just make sure it can handle the lumber.
- Drill/Driver: For screws. Lots and lots of screws. Consider it a workout for your wrists.
- Level: Crucial! Nobody wants a ceiling that looks like it’s perpetually tipsy.
- Safety Glasses: Seriously. Wood splinters are no joke. They’re like tiny, angry ninjas attacking your eyeballs.
- Lumber: The star of the show. You’ll need some sturdy stuff, usually 2x6s or 2x8s, depending on your load requirements. Consult your local building codes! This is not a suggestion; it's a decree from the DIY gods.
- Fasteners: Screws and possibly structural connectors. Think of them as the hugs that hold your wood together.
And don’t forget a healthy dose of patience. You might need more of that than anything else. It’s like brewing a fine tea; you can’t rush perfection. Though, unlike tea, you can’t sip this while you’re building. So, maybe have a beverage ready for afterward.

The Construction Zone: Building Your Box of Brilliance
Okay, deep breaths. We’re going to break this down. Imagine you’re building a really, really strong, open-faced shoebox, but instead of shoes, it's going to hold up your roof. Pretty cool, right?
Step 1: Measure Twice, Cut Once (Seriously, We Mean It This Time)
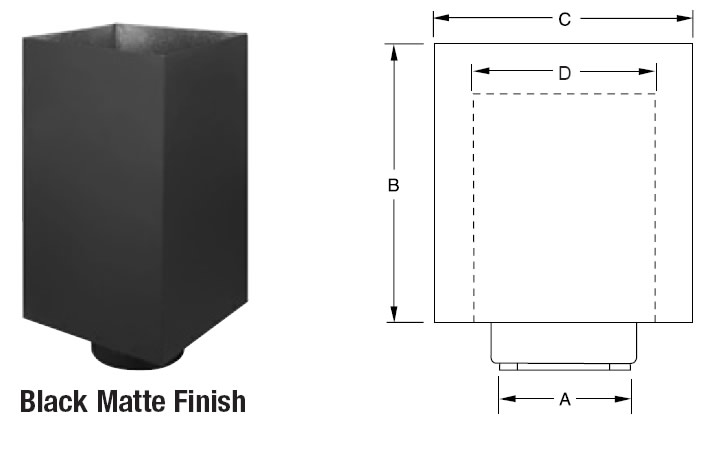
This is where your measuring tape and pencil become your best friends. You’ll need to determine the exact dimensions of your support box. This usually involves measuring the width of your space and the desired height of your box. Think about where it needs to sit within your ceiling structure. It’s often positioned at the peak of your ceiling, connecting the opposing rafters.
Pro tip: If you’re working with a pre-existing structure, or if your ceiling has some unusual angles, this step might involve a bit of on-site "figuring it out." Embrace the challenge! It’s like a really satisfying puzzle. And if you mess up, well, that's just more practice for your saw.

Step 2: The Cut and the Assembly
Now, grab your saw and get to it! You'll be cutting your lumber into the specific lengths required for the sides and ends of your box. For a basic rectangular box, you’ll have two longer pieces and two shorter pieces. Precision here is key. Jagged edges are for craft projects, not for structural support. Your cuts should be clean and square.
Once your pieces are cut, it’s time for assembly. Lay out your pieces and start joining them. You’ll typically use your drill/driver and screws. Pre-drilling pilot holes is a good idea to prevent your wood from splitting, especially near the ends. Imagine you’re building a really sturdy wooden picture frame for your sky. Solid connections are paramount.
Step 3: Adding the Muscle – The Reinforcements
A simple box might not be enough, depending on the span and the load. This is where reinforcements come in. You might need to add interior bracing or use thicker lumber. Think of it as giving your box a six-pack. More strength, more stability.
Structural connectors, like joist hangers or metal brackets, can also be your best friends here. They add an extra layer of security and ensure everything is locked in tight. Don't be shy with the fasteners; this box is holding up your roof, not just your holiday decorations.

Installation: The Moment of Truth!
This is where the magic happens. You’ve built your sturdy box; now you need to get it into place. This is often the most physically demanding part, and it’s definitely where an extra pair of hands is a lifesaver. Trying to wrestle a hefty wooden structure into place solo can be… well, let's just say it can involve more grunting than you'd find in a professional wrestling match.
Step 4: Positioning and Securing
Carefully lift your assembled support box into its designated spot. This is usually where the rafters meet at the peak. Use your level religiously. You want this box to be perfectly plumb and level. A crooked box is a sad box, and a sad box can lead to a sad ceiling.
Once it's in the right position and perfectly level, it’s time to secure it. You'll be attaching it to the existing rafters. This usually involves driving long, sturdy screws through the support box and into the rafters. Again, consult your building codes and structural plans for the appropriate fasteners and connection methods. This isn't the time to be a minimalist with your screws.

Step 5: The Final Touches and Inspections
Once your box is securely fastened, take a step back and admire your handiwork. Give it a gentle shake (or a slightly less gentle shake, depending on your confidence level). Does it feel solid? Does it look straight? If you’re nodding enthusiastically, you’re on the right track.
Now, for the grown-up part: inspections. Depending on where you live, you’ll likely need a building inspector to come and give your handiwork the official nod. This is not the time to hide your slightly off-kilter screw if you have one. Be honest, and if there are issues, they’ll guide you on how to fix them. Think of it as getting your homework graded – you want the teacher to see your best effort.
A Word to the Wise (and the DIY Enthusiast)
Installing a cathedral ceiling support box is a rewarding project. It's a tangible contribution to the beauty and functionality of your home. But remember, this is a structural element. If you’re feeling uncertain at any point, or if your project involves complex angles or significant loads, don't hesitate to consult a professional. A carpenter or structural engineer can provide invaluable guidance, saving you time, headaches, and potentially, a very expensive ceiling disaster.
So, go forth, brave DIYers! Build your boxes, create your soaring spaces, and enjoy the breathtaking heights of your new cathedral ceiling. Just remember to wear your safety glasses, measure thrice, and maybe have a friend with a strong back on standby. Happy building!