Alright, friend, let's talk art. Specifically, that gorgeous, naked canvas you just snagged. No frame, no fuss. But how to get it on the wall? Forget those clunky nails. We're going modern. We're going clever. We're going to hang this beauty like a true artistic ninja.
Because, let's be honest, nails are so last century. And let's not even start on the potential for wall damage. We're aiming for a look that says, "effortless chic," not "DIY disaster." And the best part? It's actually fun. It’s like a mini puzzle, a creative challenge for your living space. Who knew decorating could be this exciting?
So, why bother with the nail-free approach? Well, for starters, think about the aesthetic. An unframed canvas has this raw, gallery-like feel. It’s so chic. And when you hang it without a bulky frame, it really lets the artwork breathe. It becomes the star of the show, not just another item in a gilded box.
Plus, imagine you move. Or you just get a sudden urge to rearrange your entire life. With nail-free methods, you’re not patching up a hundred tiny holes. It's a win-win for your walls and your future decorating whims.
The Power of the Adhesive
Our secret weapon? Adhesive! Yep, that sticky stuff. But we’re not talking about that wobbly tape your kid uses for school projects. We're talking about high-powered, wall-friendly heroes.
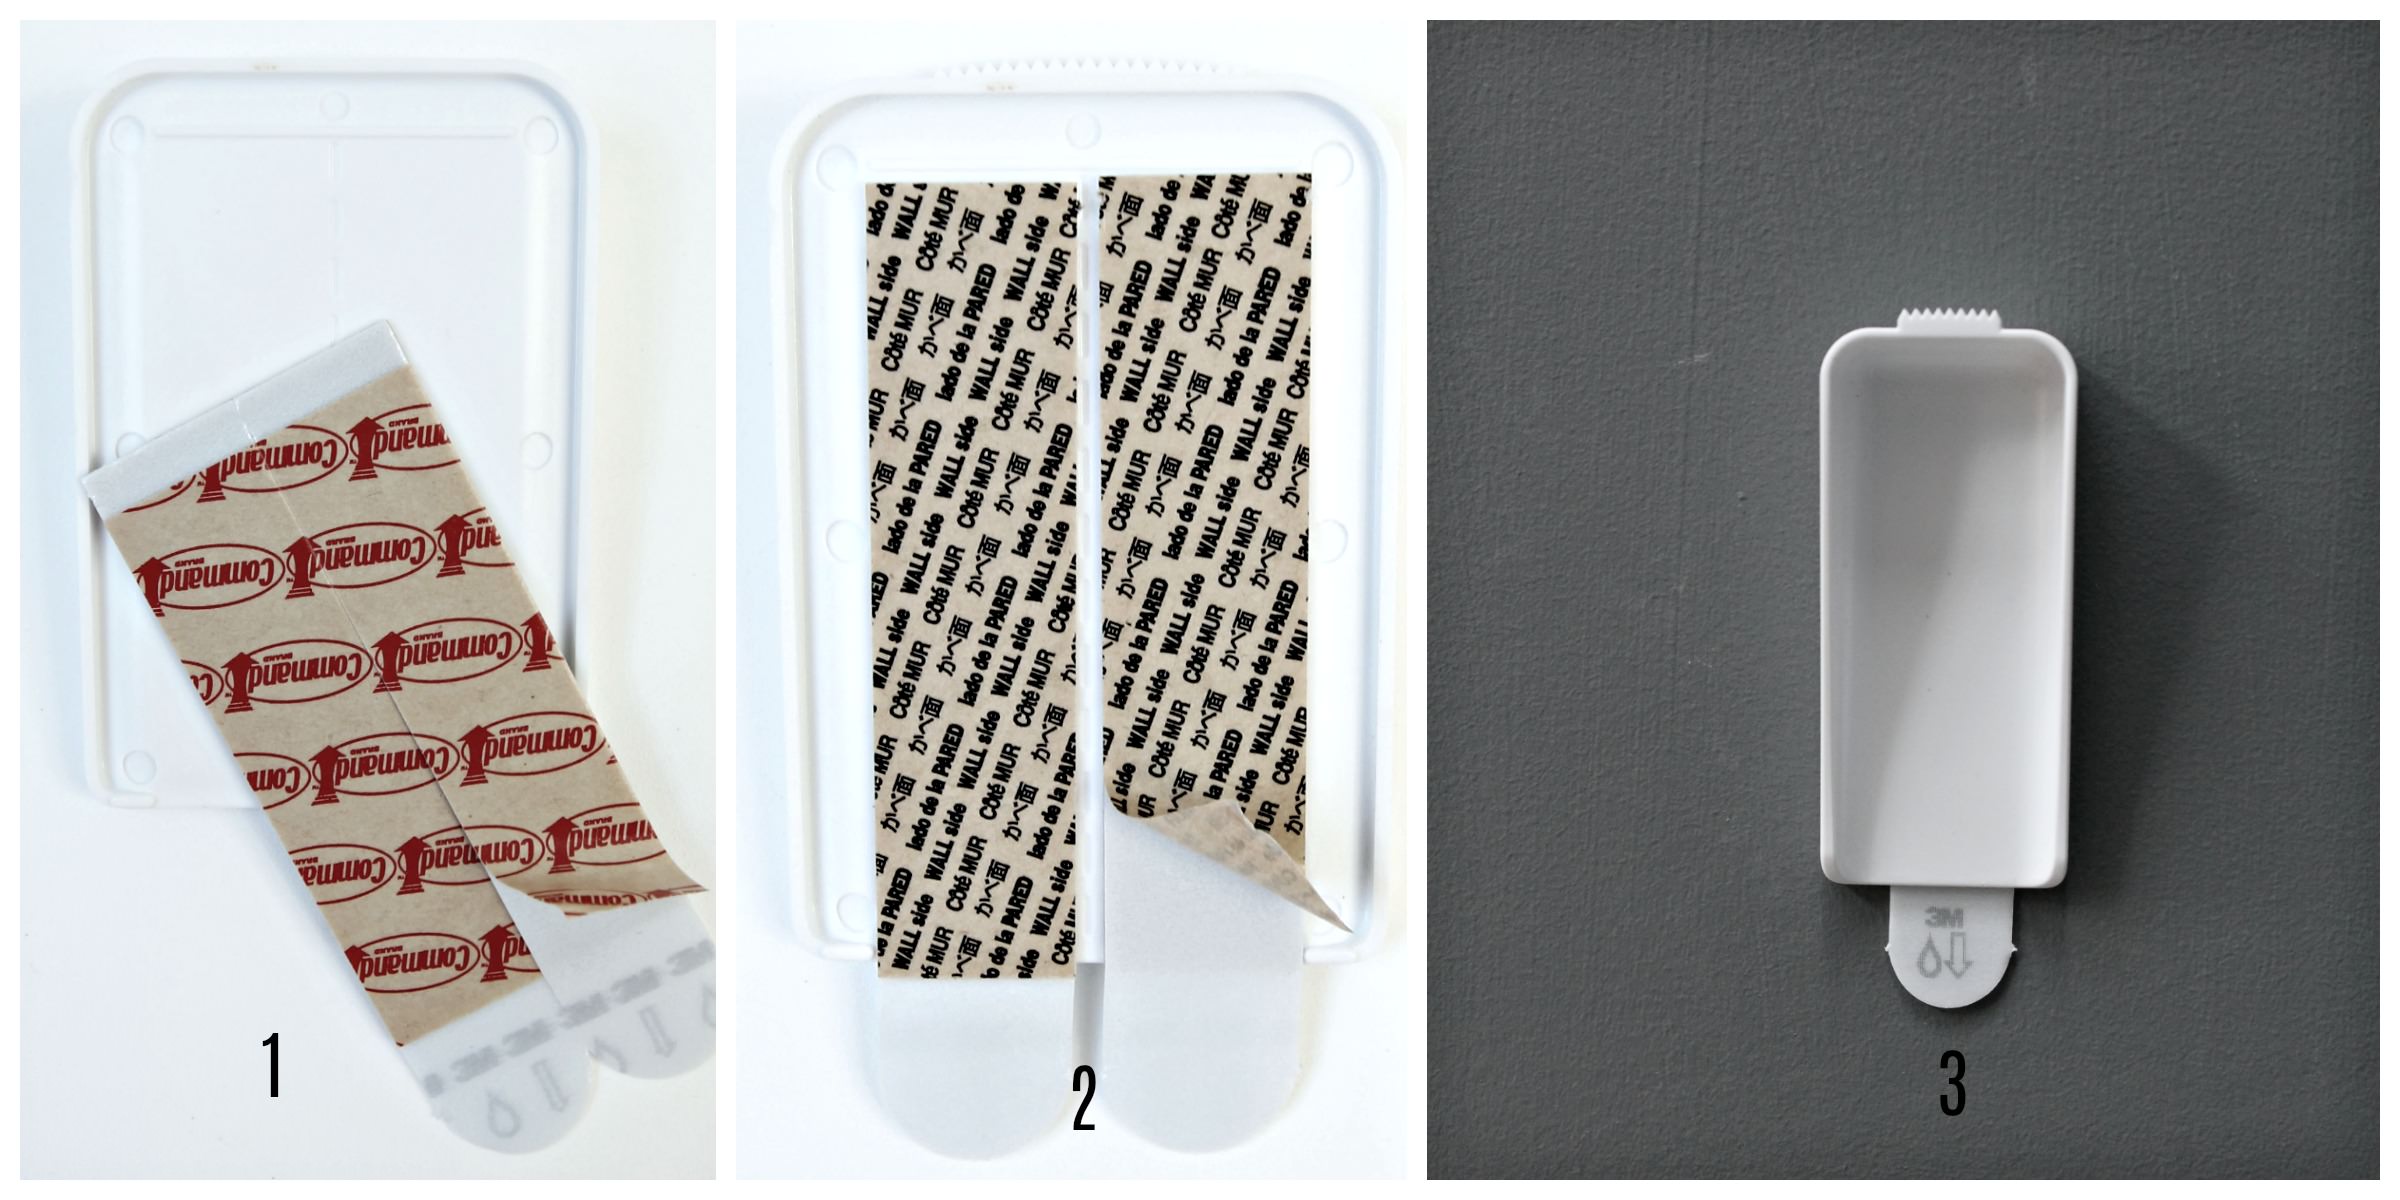
First up, the champion of temporary chic: Command Strips. You’ve probably seen them. They come in all shapes and sizes. For a canvas, you’ll want the heavy-duty ones. Seriously, check the weight limit. You don’t want your masterpiece making a dramatic floor-based debut.
The beauty of Command Strips is their removability. You peel off the backing, stick it to the canvas, press it onto the wall, and poof! Art. When you're done, you just pull the tab, and it comes off clean. No residue, no damage. It's like magic, but with more industrial-grade glue.
Think of it this way: you're essentially creating a temporary art installation. You can swap out your art as often as you change your socks (though hopefully, that's less frequent). It's like having a revolving gallery in your own home. How cool is that?

A quirky fact? These little strips were originally developed for the automotive industry to stick trim onto cars. So, your art is literally being held up by technology that can withstand the elements. Pretty impressive for something you buy at the drugstore, right?
Floating Walls and Phantom Edges
Another fabulous nail-free technique is the floating mount. Now, this sounds fancy, and it kind of is, but it's totally doable. The idea is to create a gap between the canvas and the wall, making it look like it’s hovering. Spooky, but in a stylish way.
You can achieve this with small, L-shaped brackets or even sturdy blocks of wood. You attach these discreetly to the back of your canvas. Then, you stick these brackets to the wall. The canvas then rests on these hidden supports, creating that coveted floating effect.
It takes a little more effort than Command Strips, but the result is chef’s kiss. It adds depth and dimension to your wall. It makes your art look intentional, like it was professionally curated. And you didn't even need a hammer!
The secret to a good float mount is making sure your supports are perfectly level. You don't want a lopsided canvas, unless that's your avant-garde statement, of course. But for most of us, straight and level is the goal.

Imagine your canvas looking like it’s defying gravity. It’s a little optical illusion, a touch of art world wizardry, all thanks to some clever little bits of hardware.
The Stick-With-It Attitude
What about those really big canvases? The ones that feel like they have a personality of their own? For those, we might need to get a bit more serious, but still nail-free! Enter the world of heavy-duty mounting tape.
This isn't your dollar-store double-sided tape. We're talking about industrial-strength stuff. Look for tapes designed for mounting mirrors or even construction purposes. Again, always check the weight capacity. You are the guardian of your art!
Applying it is similar to Command Strips, but you'll often be applying strips directly to the back of the canvas, and then pressing that onto the wall. Some tapes are reusable, others are more permanent. Read the instructions carefully, my friend!
This method is great for a more permanent fixture. It gives you that solid, flush look. It's like the canvas is an intrinsic part of the wall, a window into another world. And all without a single nail hole.

A fun detail? Some of these heavy-duty tapes can actually be stronger than nails in certain applications. They distribute the weight over a larger surface area. So, you're not just being fancy; you're being scientifically superior!
The Quirky Charm of Temporary Tacks
Let's not forget about the humble, yet surprisingly effective, mounting putty. You know, the stuff you use to stick posters on your wall? It comes in little tubs or pre-portioned squares.
For unframed canvases, especially lighter ones, this can be a great option. You just take a bit of putty, knead it until it’s soft, and stick it to the corners or edges of your canvas. Then, press it firmly onto the wall.
It's super easy, incredibly cheap, and perfect for renters or anyone who likes to change their mind. The putty is moldable, so you can get it to grip those uneven canvas edges. It’s like giving your canvas little sticky hands.
The downside? It’s definitely for lighter pieces. And it might leave a slight oily residue on some wall types over time. So, it’s best for temporary displays or on surfaces you're less worried about. But for a quick gallery wall update? It’s a winner.

Imagine your canvas looking like it’s casually leaning against the wall, but it’s actually held there by tiny, invisible putty elves. It’s a charmingly low-tech solution for a modern problem.
Beyond the Obvious: Creative Solutions
Are there other ways? Oh, absolutely! The world of nail-free hanging is vast and wonderfully creative. Think about velcro strips. Yes, the same stuff that’s on your sneakers! You can get industrial-strength Velcro with adhesive backing. Stick one side to the canvas, the other to the wall, and boom – instant, secure hanging.
Or how about clip systems? There are specialized picture hanging systems that use clips and wire. You attach the clips to the back of your canvas, and then a track or hooks go on the wall. It’s super secure and allows for easy adjustments.
Even something as simple as a strong, removable hook can work for smaller canvases. Just make sure it's rated for the weight. These hooks often stick with a powerful adhesive and can be removed cleanly.
The fun part here is experimenting. What have you tried? What clever solutions have you stumbled upon? This isn't just about hanging art; it's about embracing a problem-solving mindset. It's about finding joy in the little things, like a perfectly placed canvas on your wall.
So, next time you're staring at that beautiful, unframed canvas, don't reach for the toolbox. Reach for your creativity. Reach for the sticky stuff. And transform your wall into a masterpiece, one nail-free step at a time. Happy hanging!