Hey there, coffee-sipping pal! So, you've got one of those sliding screen doors, right? The ones that are supposed to glide like a graceful gazelle but are currently groaning and sticking like a grumpy teenager? Yeah, I know the feeling. It’s basically become a door-shaped obstacle course in your house, isn't it? And don't even get me started on the sound it makes. It’s like a tiny, metallic banshee wailing every time you try to get some fresh air. Pure torture.
Well, guess what? You’re not alone! We’ve all been there, wrestling with that stubborn slider, wondering if you need a degree in engineering or a personal trainer to operate it. But here’s the secret sauce, the magic trick, the thing that will bring back the smooth glide of your dreams: changing those rollers. Yep, those little guys are the unsung heroes, or in your case, the silent saboteurs of your screen door’s smooth operation.
Think of your sliding screen door rollers like the tiny wheels on a fancy luggage bag. When they’re clean and working well, your bag (or door!) glides effortlessly. But when they’re gummed up with dirt, bent out of shape, or just plain worn out, it’s like dragging that same bag through a gravel pit. Ugh. And honestly, who has time for that kind of drama just to open a door? Not you, my friend. Not anymore.
So, let’s ditch the frustration, shall we? We’re going to tackle this roller situation head-on. It’s not rocket science, I promise. In fact, it’s more like… well, it's much less complicated than assembling IKEA furniture. And way more satisfying! Plus, imagine this: the sweet, sweet sound of your screen door gliding open with the gentle caress of a summer breeze. Ah, bliss.
First Things First: The Recon Mission (What You'll Need!)
Before we get all Rambo on this door, let's get our ducks in a row. You know, the practical stuff. No need for a superhero cape here, just a few handy tools. Think of it as your mini DIY toolkit.
You'll definitely want a Phillips head screwdriver. That’s your main weapon. Most of the screws holding things together will be of this persuasion.
A flathead screwdriver can be a lifesaver too. Sometimes those Phillips screws are a bit… stubborn. It’s like they’re saying, “Nah, I’m not budging.” That’s where the flathead comes in for a little gentle persuasion.
Now, for the star of the show: the new rollers! This is crucial. You can’t just grab any old wheels. You need the right ones for your door. More on this magical quest later, but for now, just know they’re essential.
A measuring tape is your friend. We need to know what we're working with, size-wise. Accuracy is key, folks!
And, because we’re classy DIYers, a rag or old towel. For wiping away the dust bunnies of doom and any general grime. Because nobody wants to be working in a biohazard zone, right?

Oh, and maybe a helper? If your door is a particularly feisty one, or if you’re not exactly a seasoned weightlifter, an extra pair of hands can be a real game-changer. Think of them as your trusty sidekick. You provide the brains, they provide the brawn (or at least hold the door steady while you work your magic).
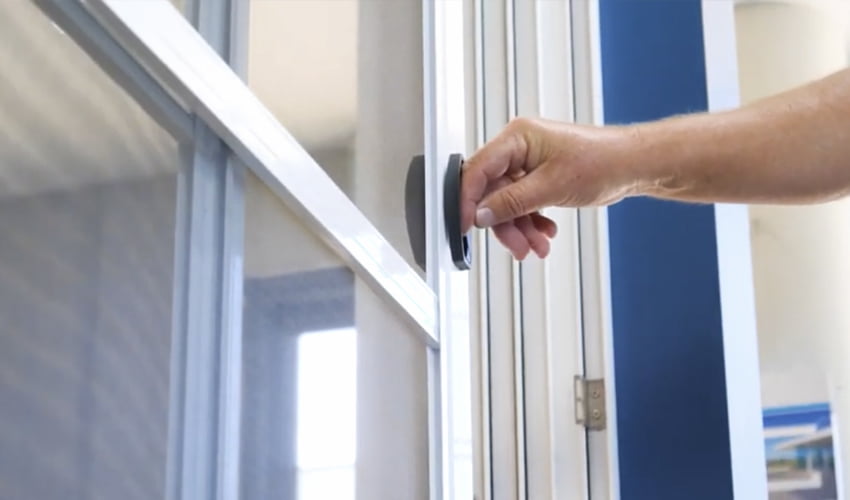
Operation: Door Extraction (Getting it Off the Track)
Alright, so you've got your tools. Now, let's get this door out of its misery. This is where things get a little… delicate. Think of yourself as a surgeon, but instead of a scalpel, you have a screwdriver. And instead of a patient, you have… a door. You get the idea.
First, you need to figure out how your door is currently attached. Most sliding screen doors have a sort of "lip" or "channel" they sit in. You need to get the bottom of the door out of that channel first.
Often, you’ll find screws at the bottom of the door frame. These might be holding a metal strip or a guide in place. Unscrew those. Don't lose those little guys! Maybe put them in a little cup or a Ziploc bag. Seriously, future you will thank you.
Once those are out, you might need to gently lift the door upwards. Sometimes, there’s a bit of wiggle room. You might have to angle it. It’s a bit of a dance, really. Like a very slow, slightly awkward tango with a piece of metal and screen.
If your door seems to be stuck, don't force it. That's a recipe for disaster. Double-check for any hidden screws or clips. Sometimes, the top of the door has little tabs or rollers that need to be disengaged from the upper track. You might need to lift the door, then tilt it inwards or outwards, depending on your door's design. Again, gentleness is key. We're not trying to break it, just… liberate it.
Once you’ve successfully wrestled the door off its track, carefully lay it down. You don’t want it standing up and potentially tipping over. Find a safe, flat spot. Maybe on some old blankets or towels to protect it (and your floor!). Now it's ready for its makeover.
The Roller Rendezvous: Finding Your Perfect Match
Okay, so the door is off. Now, let's talk about those rollers. This is where the internet is your best friend, or a good old-fashioned hardware store. You need to find replacements that are the exact same size and type as the ones you're about to remove. Don't eyeball it! Seriously. Imagine buying shoes that are a size too big. It’s just not going to work, is it?

Take a good look at your current rollers. Are they metal? Plastic? What's the diameter? How wide is the wheel? Is there a groove in the middle? All these little details matter. If you're really stumped, take a picture of your old roller and show it to the nice folks at the hardware store. They've seen it all, trust me.
You might even find that the rollers are part of a larger assembly. Sometimes, it's a whole bracket that needs replacing. Don't panic! Just try to identify the part number if there is one. If not, again, pictures are your friend. And measurement. Always measurement.
You'll probably find that doors have rollers on both the top and bottom, or just the bottom. Make sure you identify all the rollers that need replacing. It's better to be proactive and replace them all at once, so you don't have to do this whole song and dance again in a few months. You want that smooth glide to last, right?
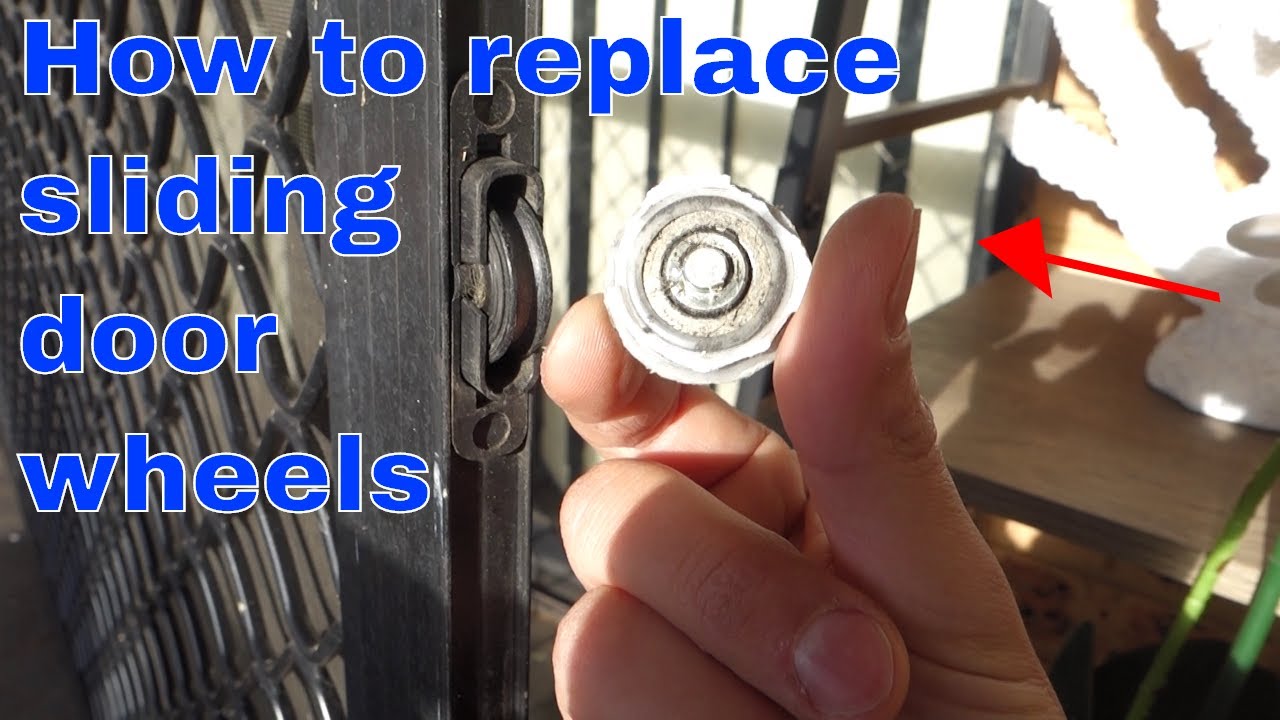
The Big Reveal: Roller Removal
Now for the moment of truth: getting those old, grumpy rollers off. Most rollers are held in place with screws. Look at the bottom of your screen door frame. You’ll likely see the rollers attached there.
Find the screws that are holding the roller assembly. Get your screwdriver at the ready. Sometimes they’re easy peasy. Other times? They’re like tiny, rusted gremlins determined to hold on for dear life. If they’re a bit stuck, a tiny drop of WD-40 can work wonders. Let it sit for a few minutes. Then try again. Patience, my friend. Patience.
Once you’ve got the screws out, the roller assembly should come free. It might be a single roller, or it might be a double roller with a bracket. Just pull it out. Voilà! You’re one step closer to freedom.
Now, take that old roller and compare it meticulously to your new one. Are they twins? Identical? If they’re not, then you’ve got the wrong ones, and it’s back to the store. No shame in that! Better to catch it now than later.
Clean up the area where the old roller was. Get rid of any gunk, dirt, or cobwebs. You want a nice, clean slate for your shiny new roller.

The Grand Installation: New Rollers, Who Dis?
This is the part where you become the hero of your own home! Take your shiny, new rollers. Line them up with the screw holes where the old ones used to be.
If your new rollers came with screws, use those. If not, use the original screws, assuming they’re still in good condition. If they’re rusty or stripped, it’s a good idea to get new ones.
Carefully insert the screws and start tightening them with your screwdriver. Don’t overtighten, though! You don’t want to strip the threads or crack the plastic. Just nice and snug. Like a firm handshake, not a death grip.
Repeat this process for all the rollers you’re replacing. If you have double rollers, make sure you install them the right way up. Sometimes there’s a specific orientation. Look at your old ones for clues, or the packaging for the new ones.
Give each new roller a little spin with your finger. Do they spin freely? Smoothly? That’s what we like to hear! If one feels stiff or wobbly, double-check that it's installed correctly and that all screws are tightened appropriately.
Now, admire your handiwork. You’ve just replaced the critical moving parts of your screen door. You’re basically a mechanical wizard. Go you!
Operation: Door Reintegration (Putting it Back on the Track)
Alright, time to put this beauty back where it belongs. This is the reverse of taking it off, but sometimes a little trickier.
Carefully lift the screen door. You might need your helper again here. Get the top of the door engaged with the upper track first. There are usually little channels or rollers up there too. Make sure those are seated properly.
Once the top is secure, you can start to lower the door. The goal is to get the new, shiny rollers to slide into the bottom track. This is where that gentle wiggling and angling comes in again. It might take a few tries. Don’t get discouraged!
Gently guide the bottom of the door towards the track. You might need to lift the door slightly and then lower it so the rollers sit in the channel. Sometimes you have to push it inwards or outwards a bit to get it to slide in properly.
Once the bottom is in the track, you can try sliding it. Does it move? Does it still stick? If it’s still a bit rough, you might need to adjust the rollers. Many screen door rollers have an adjustment screw on them. This screw can raise or lower the roller, allowing you to fine-tune how the door sits in the track and how it slides.
If you can adjust them, try turning the screw slightly. A little bit goes a long way! Turn it one way, test the door. If it’s worse, turn it the other way. You’re aiming for that sweet spot where it glides like it’s on ice.
Once the door is sliding smoothly, reattach any screws or strips you removed from the bottom of the door frame earlier. Make sure everything is secure but not overly tight.
The Victory Lap: Enjoying Your Smooth Slider!
And there you have it! Your sliding screen door is officially fixed! No more groaning, no more sticking, no more banshee wails. Just the gentle, satisfying glide of a door that’s finally doing its job. Take a moment. Bask in the glory of your DIY success. You did it!
Now, go open that door. Feel the fresh air. Listen to the birds chirping. And appreciate the silence. The sweet, sweet silence. You've earned it, my friend. You’ve earned that smooth glide. So go ahead, slide it open. Slide it closed. Do it again. Just because you can. High five!
Remember, this little bit of maintenance can save you a lot of frustration down the line. And who knows? Maybe this will inspire you to tackle another DIY project. But for now, let’s just celebrate this win. Go pour yourself another coffee (or something stronger!) and enjoy your newly functional screen door. You deserve it!